Description
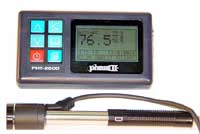
Portable Hardness Tester

Model No. PHT-2500D
State of the art, digital Portable Hardness Tester is a menu driven, multi-functional unit with extended memory and RS 232 output capabilities. This unit can perform Hardness tests that easily convert to every popular Hardness scale, including Rockwell, Brinell, Vickers, Shore, etc. Protective leather wrist strap included!
Simply put, it’s the most versatile, accurate, portable Hardness Tester on the market today!

| Operation: |
- Load the impact body
- Place the impact body on your test piece
- Push the button to begin testing and obtain reading
|
| Standard Accessories: |
- Base instrument
- Impact device D
- Calibrated test block
- Custom carry case
- Cleaning brush
- Operation manual
|
| Optional Accessories: |
- Micro printer
- Impact devices; DC, D+15, DL, G, C
- Software
- Special support rings
- Printer cable
|
| Functions: |
- Easy to read menu operation
- Large LCD display with back light
- RS 232 interface
- Automatic conversions to: Brinell, Rockwell, Vicker and Shore hardness
- Automatic mean value
- Data storage capacity
|
| Specifications: |
- Accuracy: +/- 0.5% (referred to L=800, repeated accuracy: +/- 4L units)
- Measuring range: 200-960 HL
- Materials: steel & cast steel, alloy tool steel, stainless steel, grey cast iron, spheroidal iron, cast aluminum, brass, bronze, wrought copper alloy.
- Battery type: AAA alkaline (2)
- Operating temperature: 5-104 degrees F
- Dimensions: 108 x 62 x 25mm
- Weight: 230 grams
|
 Special Application Impact Devices
Impact Device D
Universal standard device:
Use for the majority of hardness testing assignments
Impact Device DL (not shown)
Needle front section .109” diameter x 1.96” length
Measurements in extremely confined spaces
Impact Device G
Enlarged test tip: For use on solid heavy components such as; rough castings and forgings. Brinell only.
Impact Device DC
Extremely short impact device
Used for very confined spaces such as holes, cylinders, internal measurements
Impact Device D+15
Slim front section with coil set back.
Hardness measurements in grooves, recessed surface.
Impact Device C
Reduced impact energy
For testing case hardened or thin walled components
Impact Device Specifications for PHT-2500D
| Impact devices |
D/DC/DL |
D+15 |
C |
G |
| Impact energy |
11Nmm |
11Nmm |
3Nmm |
90Nmm |
| Mass of the impact body |
5.5g |
7.8g |
3.0g |
20g |
|
DL: 7.2g |
|
|
|
| Test tip |
|
|
|
|
| * Hardness |
1600HV |
1600HV |
1600HV |
1600HV |
| * Diameter |
3mm |
3mm |
3mm |
5mm |
| * Material |
|
Tungsten |
Tungsten |
|
| * |
|
carbide |
carbide |
|
| Impact device |
|
|
|
|
| * Diameter |
20mm |
20mm |
20mm |
30mm |
| * Length |
147/86mm |
162mm |
141mm |
254mm |
| * Weight |
75/50g |
80g |
75g |
250g |
| Max. hardness of sample |
940HV |
940HV |
1000HV |
650HB |
| Preparation of surface |
|
|
|
|
| * Max. roughness depth Rt |
10 m m |
10 m m |
2.5 m m |
30 m m |
| * Average roughness Ra |
2 m m |
2 m m |
0.4 m m |
6.3 m m |
| Min. weight of sample |
|
|
|
|
| * Of compact shape |
5kg |
5kg |
1.5kg |
15kg |
| * On solid support |
2kg |
2kg |
0.5kg |
5kg |
| * Coupled on plate |
0. 1kg |
0. 1kg |
0. 02kg |
0. 5kg |
| Min. thickness of sample |
|
|
|
|
| * Coupled |
3mm |
3mm |
1mm |
10mm |
| * Min. thickness of layers |
0. 8mm |
0. 8mm |
0. 2mm |
– |
| Indentation of test tip |
|
|
|
|
| With 300 HV |
|
|
|
|
| * Diameter |
0. 54mm |
0. 54mm |
0. 38mm |
1.03mm |
| * Depth |
24 m m |
24 m m |
12 m m |
53 m m |
| with 600 HV |
|
|
|
|
| * Diameter |
0. 45mm |
0. 45mm |
0. 32mm |
0. 90mm |
| * Depth |
17 m m |
17 m m |
8 m m |
41 m m |
| with 800 HV |
|
|
|
|
| * Diameter |
0. 35mm |
0. 35mm |
0. 30mm |
– |
| * Depth |
10 m m |
10 m m |
7 m m |
– |
SUPPORT RINGS: We offer a 12pc set of rings for testing concave or convex parts.


